keskiviikko 31. elokuuta 2016

The Battle of Newburn, pre-battle planning

Our club is starting an ECW campaign this fall and what better way to kick off the campaign than play the first actual battle in the English Civil War. This being the Battle of Newburn, fought 28th August 1640 between a Scottish Covenanter army of around 20,000-23,000 men commanded by General Alexander Leslie and English royalist forces of 3500-4500 men, led by Edward, Lord Conway. It took place during the Second Bishops' War (the first having only a couple of fights of not much interest except in perhaps skirmish scale gaming).

There are a wealth of resources online describing the battle and even a re-enactment video available!

The official information board at the site, photo by Doug Ridgway

Details of the board, photograph by Jon Whitehouse

The Wikipedia page

Detailed report of the proceedings of the battle

UK Battlefields Resource Centre

The Battle of Newburn Project

Battle of Newburn re-enactment

This image has been extrapolated from several different sources by yours truly taking into account the old riverbank, terrain and modern main roads slightly adjusted to match the old river bank. The brigde in my image is wrong. There is only a ford there. There were two main fordabre areas in the river and the English had built earthworks next to each one. The first one is behind the ford at the bridge site and the second one is probably more to the East-Southeast, with the ford probably being at the area of the islet in the river.

The forces of the English will comprise of 1500 cavalry and 3000 infantry and the English deployed 400 musketeers and 4 guns to each fort. Extrapolating this to the battlefield can be a bit tricky, but if I give 2 units of muskets and 1 light gun to each fort that hopefully will be accurate enough. I'll give them the "Freshly Raised" -rule to reflect green troops.

This leaves 2200 infantry and 1500 cavalry. The cavalry regiment would comprise of around 600 horse, see examples here, each being split to two functional units. Perhaps 4 units of cavalry could be a nice compromise. The cavalry were staunch and didn't much react to the flight of the green infantrymen, so I feel they would benefit from the "Steady" -rule.

And to distribute the rest of the infantry would be probably easiest to make 2 sets of 1 pike unit and 2 muskets for the English, all "Freshly Raised". The English would have 3 generals, 2 commanding one fort and 2 sets of pike&shotte and the remaining the 4 units of cavalry.

Thus the English force would comprise of:

Commander in Chief Edward, Lord Conway, Ld 8

Infantry General, Ld 8
2 pike (Freshly Raised)
4 musket (Freshly Raised)
2 musket (in fort, Freshly raised)
1 light cannon (in fort)

Cavalry General, Ld 8
4 units of cavalry

Infantry General, Ld 8
2 pike (Freshly Raised)
4 musket (Freshly Raised)
2 musket (in fort, Freshly raised)
1 light cannon (in fort)

Total: 4 pike, 10 musket, 4 cavalry, 2 ordnance.

The Scots themselves are a different matter then. To make the game interesting, they should have around twice the amount of troops. Leslie will be the C-in-C. I vaguely remember reading somewhere that the Scots had around 3000 horse, so let's give them twice the amount of cavalry to be on the safe side, so 8 units of cavalry. No special rules apart from what is in the Covenanters list to begin with. Let's command them with 2 generals.

That leaves around 17000 infantry and a heck of a lot of cannon. A lot certainly, but if we divide the forces so, that the Church has 2 light cannon positioned inside, 2 heavier artillery outside the church (medium, heavy or mortar, I have a medium piece and a mortar, so I'll probably go with them) and 2 sets of pike+shotte guarding the church, commanded by an artillery general, we have 15000-ish infantry left. The rest would possibly be represented by two forces, each led by an infantry general commanding 4 sets of pike& shotte.

This would mean that the Scots forces would be:

Commander in Chief Alexander Leslie, Ld 8

Infantry general, ld 8
4 pike
8 musket

Artillery general, Ld 8
2 light cannon (in church)
1 medium cannon
1 mortar
2 pike
4 musket

Cavalry general, Ld 8
4 cavalry

Cavalry general, Ld 8
4 cavalry

Infantry general, ld 8
4 pike
8 musket

Total: 10 pike, 20 musket, 8 cavalry, 4 ordnance.

So there. Opinions?

lauantai 20. elokuuta 2016

The Fort, Part II

Welcome back! I've now managed to proceed further with my fort after I've got (hopefully) all the necessary pieces cast in plaster of Paris. I had added the floor planks earlier (made from coffee cup stirrers) and it was rather tedious work, but made in one evening at least. Today I sanded the slopes down using a power sander. You could probably achieve the same with a styrofoam cutter and a bit of hand sanding finish, but as I was lazy and already had the tools, I chose the messier option.

Here's the simple mock-up fort with all the different types of pieces with their planks glued in place and the slopes sanded.

Adding the abattis.

Now that the walls are sloped and the abattis added, I could get a clearer picture what the fort will look like when it's complete. I hope this will qualify as "sufficiently large" for a decent siege scenario.

Gluing the plaster cast pieces in place. Especially the gabion walls needed fitting, but luckily they clipped rather nicely just by applying some force, when the cut was vertical. For horizontal cuts I used a small hacksaw. The problem with my pieces is that I made the originals slightly too low (or the walls too high), so I need to fill out the holes with filler and sand later.

So here were today's accomplishments. I will probably post part number three when I start painting the bugger.

maanantai 15. elokuuta 2016

The Fort, Part I

As you most likely already know, collecting miniatures and painting them before throwing them to the field of battle is only one part of the hobby. Another, often under-appreciated, aspect of the hobby is terrain building. It's also an aspect that I don't enjoy that much, although my wife would probably at this point shout a disagreeing "HAH!" at me given the amount of terrain lying around in our house. This is why I've moved on to mostly cardboard terrain because it's cheap, looks nice enough and is quick to build.

My Thirty Years War campaign has progressed to a finale and what better way to end a nice 3-game campaign than a siege? Of course, a proper siege game would require something for the troops to hide behind. A castle would have been one option, but I don't have one ready (although there are couple of nice cardboard plans available) and wasn't interested in building one at this stage. I wanted to try field fortifications and decided on a gabion structure that was in use during the TYW period.

I began by creating gabions. I made both a gabion basket and a gabion fence from cocktail sticks, string, sand and PVA glue.

I then created latex rubber molds of them (make at least two sets if you're planning on making your own), as I calculated that I needed at least 40 each of the buggers. For casting I've used cheap plaster that I've bought from the local book shop/crafts store. I've used dental plaster before, but it's a) more difficult to find, b) more expensive, c) tends to come in huge packages and d) is much more difficult to process after casting due to its hardness. The molds I used do have undercuts and the latex somewhat compensates for them, but they do gather air bubbles rather easily that can only partly be avoided by tapping the moulds after pouring. For terrain purposes, I don't really mind the small ones and don't bother to correct them by putty later on.

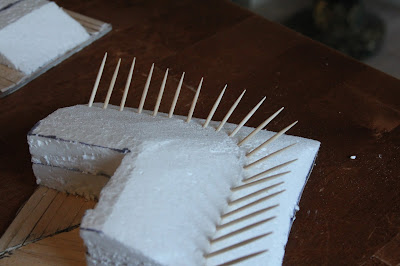
In the good time-proven tradition of cooking shows everywhere: Here's the piece that I produced earlier. It's made from 2 cm thick polystyrene sheets that were included as packaging material - probably from some IKEA furniture. I've cut 12"x3" section to the bottom and 12"x2" section to the top and sanded the slope and added filler to fill up the remaining gap. I've then added the abattis stakes (from cocktail sticks) and the plaster-cast gabions, the floor is from wooden coffee stirrers and the whole thing is mounted on a cardboard sheet. The rest is sand, glue and wooden sticks cut to size.

Here's the barebones version of the upcoming fort. Total width is 5'10" which is 175 cm to us that prefer the metric system. Given that my table is 6'x8', this will fill up the long edge nicely enough. Now all I've gotta do is cast more gabions (I've done a bit more than half so far), construct and paint the little bugger and figure out a way to store the whole thing so my wife doesn't kill me.

perjantai 12. elokuuta 2016

Bigger Battles are more fun!

My miniature collection for Pike & Shotte has now grown sufficiently to wield 2 "proper-sized" armies. With our next campaign game demanding a bit more scenery that is still in the making and my new table was almost ready, I decided to try out a full-sized game. I created two lists for the French phase of the war - a Swedish list and a HRE/Bavarian list from the Devil's Playground supplement.

Late Holy Roman Empire/Bavaria List

Late Swedish List

My list design had few philosophies behind it. Firstly I was more or less limited to the miniatures I owned. Secondly I wanted to make the lists point-balanced and thirdly I wanted to work with the structure of infantry in the center supplied with two cavalry wings. In retrospect I didn't have enough cavalry, but hey... this gives me a good excuse to buy some more cuirassiers and harquebusiers later. The result is a 850 pts pitched battle. I also seem to suffer from a lack of generals and had to substitute a couple of my old Warhammer figures. 4 of my cavalry units were also unpainted, but MOST of the miniatures here were painted, so that has to count for something right? :D

The armies meet on a 8' by 6' table. I played the Swedish, put the terrain and let my opponent choose which side of the table he would deploy from. The deployment was set to 12" from the edge. The beginner is decided by a roll of d6 and General Thiessen chooses to take the lead. He orders both cavalry wings forwards and Obersts Hellriegel and Faust successfully lead their men forwards.

After a few rounds the Veteran Regiments under Vesemayr have advanced, with Schwoeppe's Mercenary Regiments (yes, they have the Swedish Blue Regiment flags - my collection is mostly Swedish) having trouble with getting his orders understood. Faust's Light Cavalry did a brave assault on the Finnish Hakkapeliittas, but were quickly turned back. Here I apparently forgot the Hakkapeliittas' Gallopers rule, where the cuirassiers assaulted and I did an evasion response and drew the cuirassiers within shooting distance of my two light cannons and my Scottish Regiment. The unruly Finns should have countercharged and I probably forgot a sweeping advance here as well. I did remember the rule better on my left flank.

My defence is that I wielded the Hakkapeliitta troops the first time and didn't quite grasp their mechanics yet. I can only suppose that Johannes Hedlund was born on the Finland side of Sweden and had learned enough Finnish to let them of his plans and keep their thirst for blood in check. I would also suppose that a mission of "keep the enemy cuirassiers in check and avoid direct confrontation until otherwise ordered" should be something that a Finnish cavalryman should understand.

There were other faults here as well. The HRE attacked with their skirmishing cavalry, which should have not been possible as skirmishers can only charge other skirmishers, but the end result quite well demonstrates why as the HRE skirmishers were rather quickly smashed to a shaken state by a countercharge by the Hakkapeliittas and forced to retreat behind the cuirassiers. Live and learn I guess.

Thiessen seems to have gotten his ball rolling and both Vesemayr's Veterans and Scwhoeppe's Mercenaries have advanced and start raining heavy fire on my Elite Yellow Regiment troopers. There is again a charge of Light Cavalry by Hellriegel, again in skirmish formation, but I would suppose that to be able to charge regular troops the skirmishers can take up a line formation as well. Again HRE Cavalry Regiments face Finnish Hakkapeliittas with predictable results.

Lagerfelt's cavalry manage to break Hellriegel's cavalry brigade and they retreat to the small farm for shelter. Lagerfelt's remaining cavalry then takes position to protect the Elite Yellow Regiment from Schwoeppe's mercenaries whilst Bruun engages Vesemayr's HRE Veterans with his own Elite troops. Vesemayr tries to minimise damages by drawing one of his regiments to a hedgehog formation, but that offers only a temporary reprieve, as the formation doesn't really offer much when assaulted with two well-supported pike blocks.

In the end Vesemayr's brigade crushed, Hellriegel's brigade is broken and Faust's cuirassiers are shot to pieces as well when getting grapeshot to their side for several turns. Basically this leaves Scwhoeppe's mercenaries the only ones still functional and with the Swedes closing in, Thiessen makes the call to retreat.

TL;DR: The Swedes won! Some rules played wrong, but it's a learning process and it was certainly fun to play with proper-sized forces on a proper-sized table. I look forwards to our next full-sized game. This is what Pike & Shotte should be like!

lauantai 6. elokuuta 2016

Demoing Pike & Shotte at Ropecon 2016

Ropecon is an annual role-playing convention held in Helsinki and it's the biggest non-commercial event of its kind in Europe. I have been organising events there for 11 years now from demoes of various miniature wargames to tournaments. Various games that I've been presenting over the years have been Confrontation by Rackham (now defunct, but miniatures still being cast by CMON), Hell Dorado by Asmodée (subsequently bought by Cipher Studios, now a subsidiary of Soda Pop Miniatures), Warhammer Historical: Great War (out of print), Malifaux by Wyrd Games (actually still alive and kicking rather well), All Quiet on the Martian Front by Alien Dungeon (defunct, range subsequently bought by Ironclad Games) and Carnevale by Vesper-On games (defunct, range bought by Troll Trader).

From above, you might have noticed a slight unfortunate trend with the games I've been involved with. I think it's my karma or something, although it seems to be true that many upcoming scifi/fantasy games suffer from the same fate if they don't have enough financial backing to keep the ball rolling before it takes up enough speed. I started to grow tired of once again getting inspired with a new game with an uncertain future. Add to that my interest in the renaissance, the transition to Pike & Shotte was logical, and even if Warlord games (the publisher of P&S) goes belly-up, there are still dozens of manufacturers that offer miniatures to this period (see Madaxeman's listing). Most of my miniatures are from Warlord Games, but this is mostly due their plastics being very cheap and even their metal ranges have a good price vs. value rating.

Gustavus Adolphus finally painted and ready for demoing

Pike & Shotte isn't that popular yet in Finland, although the Finnish took part in the war. There is interest though and I wanted to find out how much of an interest it could gather. I chose the Swedish Phase of the Thirty Years War, as this would be the period most likely to be of interest to the participants (also my forces are conveniently built to this period as well). I did a couple of demo games at home with my regular opponents and the following images are from one of these pre-demo games. They are taken with my cell phone instead of my DSRL camera, so the image quality is worse than usual (granted, I don't much concentrate on photography when gaming usually even with a better camera).

In the demo setup the Swedish are facing the Catholic League (yes, the flags are Imperial, I know already). I tried to make balanced lists that were different enough to show how different troops varied from each other. The Catholic side had two generals of Command Rating 8, with one of them commanding the cavalry (one unit of cuirassiers and one unit of harquebusiers) and the other a tercio of catholic elite troops (represented by a large unit created by two adjacent pike blocks) and a medium cannon. The Swedish had the veteran Blue Regiment (here they had one musket unit too little), a light cannon and a Scottish mercenary regiment. The Swedes were commanded by a single Command Rating 9 general.

In the above image the Swedish have already taken their first turn and advanced rather quickly amongst the fields. During the demos I always played the Swedish side and both won and lost. After working out how to counter the League Cavalry, I decided to keep playing with fragile tactics that left my veterans vulnerable in order to demonstrate cavalry tactics to the demoee.

The fields are by Holz Artworks. I bought 2 sets of them and I've been satisfied thus far. Granted, I could have bought a 10 € doormat from IKEA and cut it to suitable pieces, but I wanted to try pre-made terrain. The cardboard buildings and terrain tend to come either from Dave Graffam Models or Fat Dragon Games.

The tactics of the typical demo are reflected here. The Swedish advance forwards (I learned to be more cautious later on), the League cavalry advance to the road to firing distance. The Scots come from the right and threaten the flank of the League troops, but that flank is already protected by the town. The Swedish light cannon concentrates its fire on the tercio (with varying success), which advances forwards with the aim of crushing the Scots.

Here the League Cavalry have attacked the Blue Regiment musketeers, with the musketeers responding by retreating to a hedgehog formation, basically tying down the Blue Regiment. I later on realised (with the here-missing musketeer unit mind you) that the Swedish veteran musketeers can take a head-on charge against low numbers of cuirassiers with their Swedish Feathers rule, especially when they are well supported by their comrades. Of course, if they can be flanked... that's a whole different story.

The League tercio usually was more than a match for the Scots, but on several occasions the Scottish did manage to repel the League forces, but that was much due to their higher morale and very lucky dice rolls. Still, on many occasions they also proved unable to understand clear orders stated in plain Swedish. In this pre-demo game after the Scots routed, it was easy for the League infantry to clear the remaining musketeers and break the battalion morale of the Swedish forces and win the game.

As for the demos themselves... my target audience was divided into three distinct groups: 1) gamers with scifi/fantasy background that had grown old and wanted something more to their games than dragons and space elves, 2) history enthusiasts and 3) people not familiar with miniature wargaming. I think I "caught them all" and I can thank the "Experience Area" staff for their recruiting skills that meant that I didn't really have much time when I wasn't running a demo game. I was also pleasantly surprised that the demos also gathered spectators of whom many followed the game for half-an-hour or more. I told the demoees that basic mechanics of the game could be shown within about 30 minutes, but each and every game I ran was so intense that people wanted to play it all the way to the bitter end... and this was on a 4'x4' table with full ranges and tiny forces. Heck... I later on heard that one guy liked the game so much he decided to buy the TYW Imperialist Starter Army from the Warlord Games store! That's probably the best response I could have received!

TL;DR: I had loads of fun! Thanks to everybody that took part either as a commander or as a spectator!

Second battle

Orders of Battle:


Bohemians


Mercenary captain Michail Hromádka (Ld 7 - 20 pts): 

  • 1 unit of dragoons (Marauders, +1 HtH) (22 pts)
  • 1 unit of cavalry (+1 HtH) (27 pts)
  • 1 unit of pike (+1 HtH) (23 pts)
  • 2 units of musket (both +1 Sht) (15 pts + 15 pts)

    Total: 122 pts

Lieutenant Martin Pyszko (Ld 7 - 20 pts):

  • 2 units of pike (22 pts + 22 pts)
  • 4 units of musket (13 pts x 4)

    Total: 116 pts


Imperials


Mercenary captain Vacláv Schovánek (Ld 7 - 20 pts):

  • 1 unit of pike (Brave, +1 HtH - 3rd regiment)  (28 pts)
  • 2 units of musket (+1 Morale - 3rd regiment) (17 pts + 17 pts)
  • 1 unit of pike (2nd regiment) (22 pts)
  • 1 unit of shotte (+1 Stamina - 2nd regiment) (17 pts)

    Total: 111 pts

Lieutenant Jan Chromec (Ld 7 - 20 pts)

  • 2 units of cavalry (25 pts + 25 pts)
  • 1 unit of dragoons (15 pts)

    Total: 85 pts

The points values were calculated using the main rulebook (I'm not certain if I did it correctly, but at least the error is systematic and thus the points should be balanced). Thus the situation after the previous battle was: 238 pts vs 196 pts (-42 pts difference / 17.6%). To even the odds a bit and make the game a bit more interesting, I decided to add some militia and a cannon to the imperial side. These were considered not to be a permanent part of the imperial army.

Militia Sergeant Alexander Maier (Ld 6 - 10 pts)

  • 2 units of Austrian militia (non-mercenary militia from imperial listing - 18 pts)
  • 1 Austrian medium cannon (non-mercenary medium cannon from imperial listing, but with morale 6+ and stamina 1 - 13 pts)

    Total: 41 pts
Thus the total is 238 vs 237 pts, but the militia is able to take position in the village thus giving an advantage to the imperial side. This is compensated by allowing the Bohemians to deploy directly to the table and take the first turn whilst the imperials enter from the road in march column.

Objectives


The objectives for the Bohemians are to drive away the militia and capture the village. The breaking of the militia does not count when calculating the Imperial army morale. The objectives for the Imperials are to relieve the militia and secure the village.


Battle at Hörersdorf

This report is written after about 2 months of the actual game, but hopefully something can still be deciphered. After the last game, the protestant forces due to some lucky rolls were markedly reinforced, so I decided to even out the score a bit to give the Imperial forces a temporary boost with 2 militia units and a cannon for the battle. The game is played with 2/3 ranges, so infantry move 4"/move and musket's firing range is 12". The Bohemians enter from the North, while the Imperial relief force enters from the Southern road. The premiese was that the Bohemian forces pushed on towards the catholic defenders who had mustered a force of Austrian militia to defend their village. The rest of the Imperial forces aimed to enter via the road to relieve the militia and are not deployed on the table.

Two units of Imperial militia and a cannon vs. 3 Bohemian infantry regiments. The battle certainly didn't start well for the catholics. The blue musketeers in the left flank of the Bohemians must have been a unit of ghosts from previous battles that tried to cause fear... their success is debatable (ie I forgot to remove them at the beginning of the game).

The Bohemians advanced with two forlorn hope troops (mercenary musketeer units), driven by their faith, hatred of the Hapsburgs, disrespect of the militia and greed. Under fire, the defending militia took advantage of their knowledge of local ground and didn't suffer too many casualties.

The Imperials enter from the road and just about manage to deploy in a clump. Getting more than one success on a Command Rating 7 is a pain and this time the command actually failed. Luckily the forces were in a column, so they managed to get on the table.

The militia decided to take advantage of the exposed flank of the Bohemian musketeers.

The relief infantry forces managed to get their troops into formation to South-West of Hörersdorf with a combination of monetary bribes and promises of Austrian wine.

God seemed to have been on the side of the militia, for they single-handedly broke the Bohemian musketeers, although they did take heavy beating as well in the process and ended up shaken and disorganised (or more disorganised as usual... these are militia troops after all). This temporary success was a pyrrhic victory as this left the already weakened militia without shelter from the approaching Bohemian infantry regiment.

The Bohemians and Imperials meet on the Western flank and begin exchange of musket fire.

The Imperial cavalry ride to relieve the militia (that wisely have retreated back to their village) on the Eastern flank where they face fierce opposition. The Imperial dragoons up front exchange fire with their Bohemian counterparts (with supporting musketeers). The resulting smoke causes the Imperial dragoons to loss their bearings and become disordered.

Under heavy fire on both flanks the casualties keep piling.

Finally the losses on the Imperial side are too much to bear and the Western flank crumbles with the Eastern flank following close behind. The militia try to take advantage of the exposed rear of the Western flank, but they arrive too late to be of any use. With the relief force retreating, the Bohemians are free to concentrate on the remaining militia that had bravely held their town. The militia quickly realise that discretion is the better part of valour - especially when faced with more than three times their numerical superiority of professional troops.

Hörersdorf ends up razed and pillaged, with only a few buildings left for the remaining inhabitants to return to after the Bohemians continue on their way towards Vienna. The militia were the heroes of the day, but their heroic defence is ultimately pointless and most likely caused even more suffering in the hands of the Bohemians to the villagers of Hörersdorf. Such is war.