perjantai 2. maaliskuuta 2018

War of Åland - The Battle of Bomarsund - planning - part 2

I'll now try to determine the English forces and apply them into Fighting Sail context. From various sources I could gather thatthe British had 25 vessels: fleet of four 60-gun block-ships, one 34-gun screw-frigate and a dozen smaller vessels. I'll add the points cost here for me to help design the scenario and thus estimate the relative power of the forces.

Google Books then provided me excellent insight from the letters of the British commanders involved on the progression of the actual battle and even gave me the names of several of the ships involved:

The Ships-of-the-Line


(c) Wikimedia Commons (Vengeur class image)

The namesake of the Blenheim-class (old Vengeur-class 3rd rate ships-of-the-line converted to steamers) originally with 74 cannons, but after conversion to steam guard ship, was reduced to one deck only and the amount of cannons to 60. The engine was 450 hp steam screw capable of up to 8.9 knots. The ship had light rigging as well for an alternative source of power.


(c) Wikimedia Commons (Vengeur-class image)

An another Blenheim-class 3rd rate ship-of-the-line.


(c) Wikimedia Commons

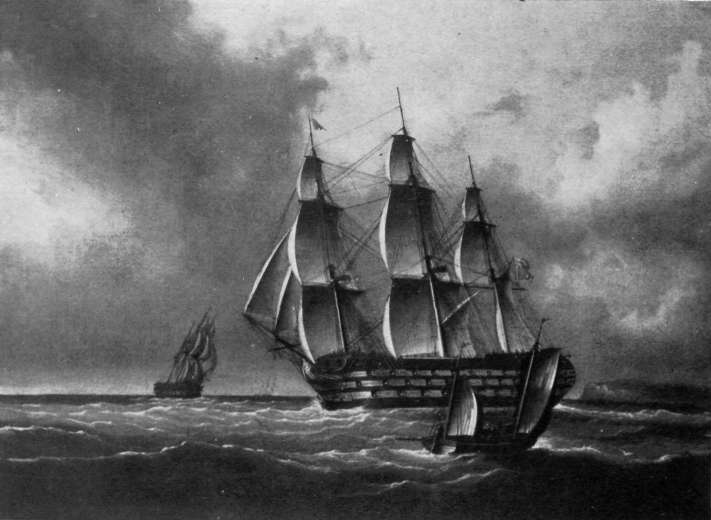
Another Blenheim-class, in the image depicted after the Blenheim-class conversion.


Blenheim-class, but I couldn't find an image. Probably looked a lot like HMS Hogue though.

Rear-Admiral Chads was known for his gunnery skills. I would give him the Gunner Admiral Archetype, as during the Baltic campaign, admiral Sir Charles Napier claimed that Chads ‘knew more about gunnery than any man in the service'.

How about rules?


Now... for the rules bit on these 3rd rate ships-of-the-line. The normal stats (probably depicting Vengeur-class) are depicted as below:


Cost Sailing Discipline Boarding Gunnery Hull
Flagship 56 4 8 7 8 7
Regular 52 4 6 7 8 7

But.. as there have been substantial changes after the Blenheim class, these need to be adjusted.

The game gives the amount of guns to a 3rd rate ship as 64-84 and for 4th rate ships 44-54. This is depicted as Gunnery 8 for 3rd rate ships and 6 for 4th rate ships. The logical new value after the reduction of guns in the Blenheim class would thus be 7.

After reduction of the hull to a single deck and knowing that the 4rd rate ships tended to be two-deckers, the amount of Hull should be reduced. A British 4th rate ship has a Hull value of 5 and a 5th rate Frigate has a hull value of 3. Still, given that these were originally bigger ships than 4th rates, I'd not reduce the Hull value to less than 5, so let's have that.

Now... the conversion to steam power should provide some advantages as well! The engine provides nearly 9 knots of speed and a fully rigged 1st rate ship-of-the-line such as HMS Victory can move at 11 knots. The rigging was made lighter, so a maximum speed of 9 knots would probably still apply. I would probably keep the Sailing value at 4, but reduce the cost of Tacking to 1 sailing point and enable them to make tight turns even when Running. I would also give the steamships +1 to the sailing roll when Close-Hauled or in Irons. They should not be faster than sailships when Reaching or Running, but should have distinct advantage to sailships when the wind conditions are not optional. Also, removing Anchor-tokens should be a breeze.


Cost Sailing Discipline Boarding Gunnery Hull
Flagship ? 4 8 7 7 5
Regular ? 4 6 7 7 5

Steamship: May make tight turns even when Running. Tacking costs only 1 Sailing Point. +1 to roll when Close-Hauled or in Irons. Succeeds automatically on Discipline rolls to remove Anchor tokens.

I've left the costs as a question mark, since I really have no idea on how to balance these yet... but perhaps the regular point costs would be used when calculating morale. I need to test these modifications first before I can make decisions on the matter.

The Frigates


My Google Books source, British Battles of the Crumean Wars 1854-1856: Despatches from the Front, also gives me names of several frigates:

The French

Asmodée 

20 guns, French Gomer-class paddle frigate, launched 20 October 1841 at Rochefort

(c) Unknown

Frigate Gomer, same class as Asmodée (c) Unknown


Phlegeton


(c) Getty Images


Darien 

14 guns, converted French paddle packet (begun as Transatlantic Packetboat No.1), 14, launched 6 October 1842 at Cherbourg. Probably resembled Gomer class steam frigates more or less, so I can use the same model as for Asmodée.

Rules for the French Frigates

The normal rules for French Frigates are thus, but again, these need adjusting. The rules represent 32-40 -gun frigates for 5th class and 24-28 -gun frigates for 6th class.

Cost Sailing Discipline Boarding Gunnery Hull
5th rate (frigate) 31 7 4 3 2 3
6th rate (corvette) 16 8 3 2 1 1

If I've understood correctly, both Asmodée and Phlegeton had 20 guns whilst Darien had 14 guns. This would be adjusted to Gunnery 1 for both classes. A "quick fix" would be thus.

Cost Sailing Discipline Boarding Gunnery Hull
French paddle frigate ? 7 4 3 1 3
French screw corvette ? 8 3 2 1 1

Steamship: May make tight turns even when Running. Tacking costs only 1 Sailing Point. +1 to roll when Close-Hauled or in Irons. Succeeds automatically on Discipline rolls to remove Anchor tokens.

The British

H.M.S. Arrogant


(c) Wikimedia commons

46-gun screw frigate

36-gun wooden hulled screw frigate


(c) Wikimedia commons

16-gun steam powered paddle frigate of the Royal Navy built at Pembroke Dockyard and launched on 30 April 1851.

Rules for the British Frigates

Here are the stats for napoleonic British frigates, gun stats as previously:


Cost Sailing Discipline Boarding Gunnery Hull
5th rate frigate 26 6 5 3 4 3
6th rate frigate 14 7 4 2 2 1

Again, we need to do a bit of conversion. HMS Arrogant and HMS Amphion packed a punch, so let's keep the Gunnery at 4, but reduce the Gunnery of Valorous to 1. Otherwise I don't see much need to adjust, so let's just add the steamship rule.

Cost Sailing Discipline Boarding Gunnery Hull
Arrogant and Amphion ? 6 5 3 4 3
Valorous ? 7 4 2 1 1

Steamship: May make tight turns even when Running. Tacking costs only 1 Sailing Point. +1 to roll when Close-Hauled or in Irons. Succeeds automatically on Discipline rolls to remove Anchor tokens.

Sloops


H.M.S Driver


(c) Wikimedia commons

6-gun wooden paddle sloop, namesake of the Driver-class

H.M.S. Bulldog


(c) Unknown


6-gun wooden paddle sloop

H.M.S. Hecla


Wreck of HMS Hecla (c) Illustrated London News


4-gun wooden paddle sloop


Sloop rules


Fighting Sail does not provide rules for sloops, but the British have 3 sloops with 16 guns. They could be based on a single base and using the rules for HMS Valorous, but perhaps with some adjustments to the rules:

Cost Sailing Discipline Boarding Gunnery Hull
3 x wooden paddle sloops ? 7 4 2 1 1

Steamship: May make tight turns even when Running. Tacking costs only 1 Sailing Point. +1 to roll when Close-Hauled or in Irons. Succeeds automatically on Discipline rolls to remove Anchor tokens.

Sloops: May not roll for Damage Control. Each Damage Token increases the difficulty by one (with 1 Damage Token short is hit on 4+, medium at 5+, long at 6, with 2 Damage Tokens short is hit on 5+, medium is hit at 6, long cannot be hit at all). Explosions are caused as normal. Sloops are removed from play after receiving 3 Damage Tokens. Counts as a single frigate when creating squadrons, needs to be formed into a squadron.


tiistai 27. helmikuuta 2018

War of Åland - The Battle of Bomarsund - planning - part 1

Please refer to https://en.wikipedia.org/wiki/Battle_of_Bomarsund for basic information regarding the conflict.

Now, as for wargaming purposes, the battle seems to be rather dull. Take 25 British ships, anchor them and gradually pummel the fortress to smithereens. Not very exciting, but this is more or less what really happened - in addition to the fortress also being besieged from land.

Given that the folk song concerns this specific battle, I have no good reason to skip it, so perhaps it's time for a bit of alternate history - a "what if" -scenario.

The core elements will involve:
- Bomarsund fortress (obviously)
- A relief fleet of Russian ships / Finnish merchant ships that are inferior to the British ones, but still able to put up a decent fight (this never happened, but I want a naval wargame, so something like this is needed).
- make an assumption that the French and British infantry hadn't destroyed the towers of Brännklint and Notvik so that Bomarsund would have it's contemporary power at use at this "what if" -battle
- as in history, the Bomarsund tower cannons will have worse effective range than the British fleet, so this will have to be represented somehow and to be both exploited by the British fleet and used as a tactic by the Russians.

The victory conditions for the British fleet will be to either a) destroy the 3 towers or b) drive off the relief fleet. The Russian side will attempt to drive the British fleet more within range of the tower's cannons thus getting their real firepower into use and eventually drive the British off.


Map showing a bit of the geography of the area and the arrival of the British fleet

The British arrive from the South as is historically accurate and the Russian relief fleet would arrive from the North. The logical assumption of their origins would be Uusikaupunki, where at least in the summer of 1855 there were Russian troops positioned there 7 km from the town commanded by colonel Engelhard. Mind you, this was a year after the destruction of Bomarsund, but that would provide a viable naval base from where the relief would operate from and there exists a naval route via Vargatafjärden from the North that connects to routes leading to Uusikaupunki. Not that far-fetched hopefully.


War of Åland - Introduction

Deviating from the renaissance period rather harshly (although I've gamed it a number of times recently in addition to playing Flames of War), I'm now planning on researching the War of Åland and seeing if that can be reasonably portrayed as a wargame.

This rather unknown naval conflict, part of the Crimean war, took place in the Baltic sea 28th March 1854 to 20th September 1854 and 17th April 1855 to 10th December 1855. Finland was during this period under Imperial Russian rule, but most of the conflicts took place in what is today considered to be Finnish territory.

The war is currently remembered mostly in a folk song called "Oolannin sota" (War of Åland), which is a cleaned up version of an original song created by a Finnish prisoner of war during imprisonment in Lewes, possibly the author being a military physician called Johan Wallenius, but that can be only speculated upon.

The Finnish lyrics (of the currently sung version) are thus:

Oolannin sota

Ja se Oolannin sota oli kauhia
Hurraa, hurraa, hurraa
Kun kolmella sadalla laivalla
Seilas engelsmanni Suomemme rannoilla
Sunfaraa, sunfaraa, sunfarallalallala,
Hurraa, hurraa, hurraa.

Se oli niin komeata katsella
Hurraa, hurraa, hurraa
Kun engelsmanni seilasi lahdella
Juuri Oolannin fästingin kohdalla
Sunfaraa, sunfaraa, sunfarallalallala,
Hurraa, hurraa, hurraa.

Ja se oli vihollisen meiniki
Hurraa, hurraa, hurraa
Että ampua murskaksi fästinki
Ja ottaa se sotaväki fangiksi
Sunfaraa, sunfaraa, sunfarallalallala
Hurra hurraa, hurraa!

Mutta Suomen poijat ne ampuivat
Hurraa, hurraa, hurraa
Että fästingin muurit ne kaikuivat
Ja Oolannin rannat ne raikuivat
Sunfaraa, sunfaraa, sunfarallalallala
Hurraa, hurraa, hurraa!

A very quick and dirty translation into English would be:

War of Åland

And the War of Åland was terrible
Hurrah, hurrah, hurrah
When with three hundred ships
did the Englishman sail at our shores
Sunfarrah, sunfarrah, sunfarrallallalah
Hurrah, hurrah, hurrah

And it was so grand to see
Hurrah, hurrah, hurrah
When the Englishman sailed on the bay
Just at Åland's Bomarsund fortress
Sunfarrah, sunfarrah, sunfarrallallalah
Hurrah, hurrah, hurrah

And that was the enemy's intention
Hurrah, hurrah, hurrah
To shoot to pieces the Bomarsund fortress
And take the soldiers within as prisoners
Sunfarrah, sunfarrah, sunfarrallallalah
Hurrah, hurrah, hurrah

But the boys of Finland they shot [their cannons]
Hurrah, hurrah, hurrah
Making the walls of the fortress and the
shores of Åland echo [with the sounds of their cannonade]
Sunfarrah, sunfarrah, sunfarrallallalah
Hurrah, hurrah, hurrah


https://www.youtube.com/watch?v=l-l2AdP4YF4 <- this link provides the song and also another translation (probably better than mine).


Bombardment of Bomarsund - Wikimedia Commons


My first problem was when it came to wargaming was that basically the English and French fleets more or less sailed over the Russian fleet and blasted the Finnish coastal fortresses to smithereens. This will pose a problem for scenario design, but hopefully Jay White's excellent scenario design article in Wargames Illustrated 358 (August 2017) will provide me with some insight. These will mostly be one-off scenarios to be played with bunch of friends, so the scenarios need not be balanced as such - although giving the Russian army at least some fighting chance to win the scenarios would be nice.

My connection to the war is that I have visited the Viapori fortress (nowadays Suomenlinna) dozens of times during my youth and it holds a special place in my heart. Also one of the fortresses involved was Svartholm fortress in the neighbouring city of Loviisa, although it's involvement was rather anticlimatic.

I'm a total newbie to naval wargaming, but the rules system I plan to use is is Fighting Sail by Osprey publishing, as the rules are very clearly written and at they have received several rather good reviews. I'm not aiming for historical simulation, but more of an enjoyable gaming experience. The biggest problem with the rules is that they don't allow for steam-powered ships, but I think they might be easily adjusted for by (for instance) giving steamships +1 to sailing rolls. The Russian fleet/Finnish merchant fleet was mainly sail-powered so for those I can use the rules as is.

I'll be using 1:1200 ships, most likely I'll 3d-print them myself using epengr's Age of Sail -set, which print out comparatively well on my cheap Flashforge Finder printer (at 0.05 mm resolution).


A quick experimental paintjob with paper sails.
I still need to add rigging, a national flag and a base, 
but this is sufficient for my purposes.


Of course, I'll need to create remixes of some of these models to add for steamship elements, but luckily the details are so small that very rudimentary 3D-modeling will suffice (ie probably a box and a couple of cylinders, but perhaps more if I get inspired).

My premise for the models will be that I since I have trouble distinguishing a 1st rate ship from a 2nd rate ship at normal gaming height, the differences between different 1st rate ships aren't that important.. "close enough" being the rule here and that for me is a very flexible rule.

This may provide me a good opportunity to do some historical research. This is a rather passive project at the moment (as is this blog), but my intention is to use this blog for myself in order to collect my thoughts and ideas about the campaign and if it attracts readers, all the better. Don't expect regular updates though.

Breitenfeld

This post is about half-a-year late, but I figured better late than never. There's been no new progress on my fortifications so far, mostly due to other projects. The First Battle of Breitenfeld was fought on September 17th 1631 and was one of the significant victories of for Sweden during the Swedish phase of the Thirty Years War. This was also the scenario featured for the Swedish phase in the Pike & Shotte expansion The Devil's Playground.


Gustavus Adolphus in the Battle of Breitenfeld by Johann Walter Me and Antti were demoing P&S in Ropecon 2017 and we tried out the scenario beforehand at my place and played it twice during the event. We had good participation in the event and people certainly seemed to like the game. Special thanks to Aleksis Meaney for volunteering to us out demo the game and doing it for both days, even though he was originally participating as only a visitor. The following report is a hodgepodge combination of the three games we played.

 
Battle of Breitenfeld - Initial dispositions, 17 September 1631 (The Department of History, United States Military Academy) In the historical battle, the Saxons were routed by Imperial cavalry and the Swedes the crushed the Imperial left flank with Swedish cavalry led by Gustavus Adolphus also capturing their artillery and the Imperial line finally collapsed under Swedish fire. Curiously enough, nothing like this happened in our own games.


Initial dispositions, basically the same in all games. This picture from my house.


The initial dispositions at Ropecon 2017, pictures by Antti Lahtela

As I have a Swedish army, I will be writing from that point of view.
In all our games the proceedings were basically that the Swedish center held and managed hold against or repeal the Imperials, the right Swedish cavalry wing was systematically defeated by Imperial cuirassiers and there was a bit of variance between how the left Swedish flank fared. If I recall correctly, we managed to get a Swedish victory, an Imperial victory and a draw from the same scenario, so when it comes to equal opportunity for pulling a victory, the scenario seems to be well balanced.

But you probably want to see pretty pictures of miniatures instead of reading me rambling, so here they are!


From the pre-demo game, the Swedish cavalry wing proceeds with commanded shotte at the front, attempting to soften the Imperial scum before a crushing blow from the Swedish cavalry and Finnish hakkapeliittas - or at least that was the original plan.

Again, it should have worked, even as I managed to lure a unit of cuirassiers into a position where I had Swedish cavalry at the front, Hakkapeliittas at the rear and commanded shotte at the flank - and all had a supporting unit behind them! What could possibly go wrong after such clever manoeuvering as this!
Meanwhile, on the left Swedish flank, the Scots and Swedes put pressure on the Imperial Harquebusiers.
It's not clearly visible, but here the Swedish right flank has already broken and is retreating, whilst the Imperials are consolidating their positions. The Swedish left flank has secured their advance better.


During RopeCon we played the scenario several times with both Swedish and Imperial occasionally winning the day. What was almost a constant feature was that the right Swedish flank tended to fail every time, which didn't match the historical result and the center held rather well where as the Swedish left flank tended to be the side where the breakthrough was made. This may be a problem regarding the scenario in Devil's Playground or how Swedish cavalry vs cuirassiers are portrayed in the rules.

It was also quickly established that the rules for Gustavus Adolphus in Pike & Shotte are rather unbalanced, although it certainly does provide for glorious charges lead by the king. It may capture the spirit and incite players to play the king aggressively, but gameplaywise they are too strong and a bit silly too if considering the historical aspect. Perhaps an another approach would have been better. We may have to make house rules later on to cover for this legendary personality.

All in all, very enjoyable games and we had a constant audience present with some total newbies to wargaming that picked up the gist of the rules quickly.